Group Detail - Expert/Admin
- Group Detail Summary
- Group Name
- Group Link
- Reports Accessible by Individuals
- View Group Reports
- Explore
- Members
- Reports
Each group’s page holds all information associated with that group and its group members.
Group Name
This is where the page shows whatever name you used to create this group.

However, you’re not stuck with that name. At any time, you can click “Change” next to the pencil icon to update the name of your group. A text field will show for you to edit the name and when you are finished, click the blue checkbox to confirm your change. A green notification will appear at the top of your page that says, “Successfully updated the group's name.”
Can members see what I name a group?
Members will not see what you name a group, but would see the Group Code you create in the Group Link (see below)
Group Link
This is the link you email to people to invite them to join this group. When the person clicks the link, they will end up at this website and be invited to create their account. Once they've created their account they'll be logged in and automatically added to the group this link was attached to.
Create Your Group Link
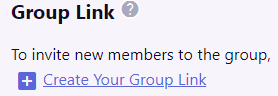
If you are making a new group, you will also need to create a group link to email to people to join your group. Click “Create Your Group Link” to do so.
A box will appear that says “Enter Group Code.” Pick a name or word to identify this group from all of your other groups. More about the Group Code below.
{danger}WARNING! Members of a group see the group code you assign their group in the group link that you send them. So, be careful if you have “low performers,” “anger management issues,” or another potentially sensitive title as your group name. You may want to be tactful in how you designate the group in your group code.
Type your chosen group code in the box and click the blue check mark button. Simultaneously, a link to your group will appear under the Group Link heading and a confirmation notice will show at the top of the screen that reads, “Successfully updated the group's link code to..._.”
Group Code

A group code is whatever name you choose to add onto our website URL link to distinguish this specific group from all of the rest.
For example, if you made a group for first year university students, you might name the group “freshmen” or “year one”.
You will need a link to send those students to their specific group on this website, so our system makes a link to our site that starts with our website info with your “Group Code” tack onto the end to direct the student to the specific page they need to go to within our system.
Copy Link Button

Click the blue “Copy Link” button under the Group Link heading to copy the group link. This allows you to paste it in emails inviting people to join your group.
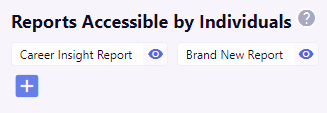
Reports Accessible by Individuals
{info} Reports Accessible by Individuals is an easy way for you to give an individual report to ALL of the members in a group. Each report is about one individual and accessible only by that individual.
Add a Report to “Reports Accessible by Individuals”
When you would like all group members to get an Individual Report, you want to add it to the “Reports Accessible by Individuals” section of the group.
You add a report to “Reports Accessible by Individuals”, by clicking the blue “+” icon.
A drop down menu will appear that says, “Search for Report.” When you click the “V” icon, a list of all the individual reports you have created within the group will appear.
Click the report you would like and it will appear in the menu’s box. Beside the report name will be options to either cancel the transaction (an X icon), go back to scrolling through the list of reports (the V icon), or to confirm your selection (the check icon). If you choose to confirm your selection, then a green confirmation notice will pop up at the top of the page that says, “Successfully added this report to the group” and that report will show in the “Reports Accessible by Individuals” section.
Create a New Report for “Reports Accessible by Individuals”
If you need to create a new report to add to the group, read how here.
View a Report in “Reports Accessible by Individuals”
Below the “Reports Accessible by Individuals” heading is a list of all the individual reports you have made available to the group.
You can click the eye icon to view the short description that you wrote about the report when you made it.
If you want to view that specific report on one of the members of the group, scroll down and select the report of the member. Read more here
Edit a Report in “Reports Accessible by Individuals”
If you want to edit that report, then you would want to navigate to the Manage section and look under the “Reports” heading. From there, you can see and edit all of the reports you have made for your organization so far. Read more here.
Delete a Report in “Reports Accessible by Individuals”

If you hover over one of the report boxes, a red circle with a “-” in it will appear on the top left corner of the card. When you click it, a box with a red trash can icon will pop up and ask you to “Confirm Delete?” If you click the red trash can icon, the report will be removed from the “Reports Accessible by Individuals” area and the report box will disappear from the list. Simultaneously, a green confirmation notice will pop up at the top of the page that says, “Successfully removed “this report” from the group.”
{info} NOTE: Removing a report from the “Reports Accessible by Individuals” area does not remove it from the organization or any of the other groups that report is in.
View Group Reports
“View Group Reports” automatically shows all of the group reports you have created for your organization. Each report has its own card with the report name, a short description and a button to view the report. If you click the blue “View Report” button, a new tab will open with the full report containing all the group members’ information in it.
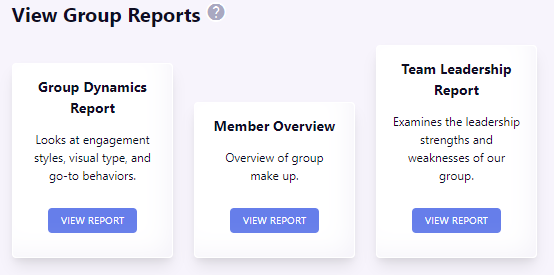
What is a Group Report?
Group Reports take the psychological data of all group members and mesh their information together in one report to describe many aspects of the group’s unique dynamic. Group Reports are an exceptionally unique and powerful tool.
View a Report in “View Group Reports”
Each report has its own card with the report name, a short description and a button to view the report. If you click the blue “View Report” button, a new tab will open with the full report containing all the group members’ information in it.
Add a Report to “View Group Reports”
When you create a new group report in the Manage section it will automatically be added to the “View Group Reports” area of all groups.
Explore: Wizards & Assessments Assigned to the Group
{warning} The Explore section documentation is currently under construction.
Members
The Members area of the Group page is where you can see the members of your group, view their information, and add and delete people from the group.
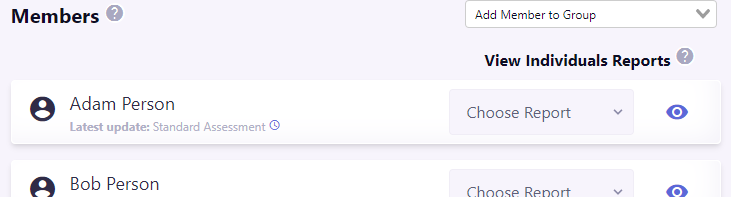
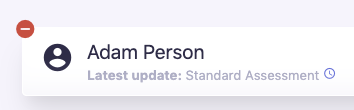
Member Name Cards
This is an alphabetized list of every member of the group and each member has a name card. Each name card allows you to access information about that person. On the surface, you see the person’s name, and below that, information about their last update. It shows what they did Expert? Wizard? Are these the only two options? and clicking the clock icon reveals the date (year-month-day) and time (24-hour time system) they did it.
View Individuals Reports
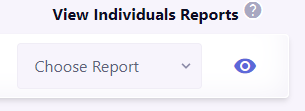
On the right of each name card, is a “Choose Report” box. Clicking this drops down an alphabetized list of all the reports about this person? all the ways you can view their data in a report? Click a report and a tab withe the full report will open.
View Member Profiles
To the far right of the name card, there is an eye icon. Clicking this will take you to the person’s profile page.
Read more about people detail pages.
Add Member to Group

Above the list of members on the right hand side is a drop down menu that says, “Add Member to Group.” Click it to see a list of all the people in your organization. The list is alphabetized by first name. Scroll through the list and click the desired person to add. The person’s name will fill the box.
Beside the box will be options to either cancel the transaction (an X icon), go back to scrolling through the list of names (the V icon), or to confirm your selection (the check icon). If you choose to confirm your selection, then a green confirmation notice will pop up at the top of the page that says, “Successfully added this person to the group” and that person will show in the Members list.
Delete a Member from the Group
If you hover over one of the member name cards in the Members list, a red circle with a “-” in it will appear on the top left corner of the card. If you click it, a box with a red trash can icon will pop up and ask you to “Confirm Delete?”
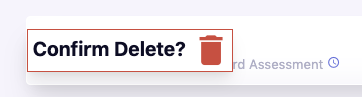
If you click the red trash can icon, the member’s individual name card will disappear from the Members list and a green confirmation notice will simultaneously pop up at the top of the page that says, Successfully removed “this person” from the group.”
{info} NOTE: Removing a report from the “Reports Accessible by Individuals” area does not remove it from the organization or any of the other groups that report is in.
Reports
A report uses a person’s psychological data gathered by a wizard to fill in a report template around whatever subjects the report creator has chosen.
Report Types
Reports can describe individuals (Individual Report), two people and their dynamic (Two Person Comparison Report) or a group of people and their dynamics (Group Report). Reports also have different accessibility options, depending on who you want to see the report and who individuals want to share their reports with.
Individual Reports
Individual Reports use one person’s wizard data to fill in a report about that one person around whatever subjects you choose.
For example, Bob is one of your struggling, first year students. You want to understand how to best interact with Bob and give him the tools to shore up his challenges. You may make a report that includes sections like “Interaction Styles Stress Management” and “Mentoring Insights and Suggested Activities”, so that he can better manage the stress that manifests for his type and you can know how to mentor him in alignment with his type.